

目录
- FastDFS介绍
- 环境准备
- 服务安装
- 安装libfastcommon
- 安装FastDFS
- 配置tracker
- 配置storage
- 服务测试
- 配置http访问
- fastdfs-nginx-module
- nginx
- 访问测试
简介
FastDFS是一款C语言实现、开源的轻量级分布式文件存储服务,支持Linux、FreeBSD、MacOS等类UNIX系统。它对文件进行管理,功能包括:文件存储、文件同步、文件访问(文件上传、文件下载)等。
FastDFS 中有三个角色:跟踪服务器(Tracker Server)、存储服务器(Storage Server)和客户端(Client)。
- Tracker Server:跟踪服务器,主要做调度工作,起负载均衡的作用。在内存记录集群中所有存储组和存储服务器的状态信息,是客户端和数据服务器交互的枢纽。相比 GFS 中的 Master 更为精简,不记录文件索引信息,占用的内存量很少。
- Storage Server:存储服务器,又称存储节点或数据服务器。文件和文件属性(Meta Data)都保存到存储服务器上,Storage Server 直接利用 OS 的文件系统调用管理文件。
- Client:客户端,作为业务请求的发起方,通过专有接口,使用 TCP/IP 协议与跟踪器服务器或存储节点进行数据交互。FastDFS 向使用者提供基本文件访问接口,如 upload、download、append、delete 等,以客户端库的方式提供给用户使用。
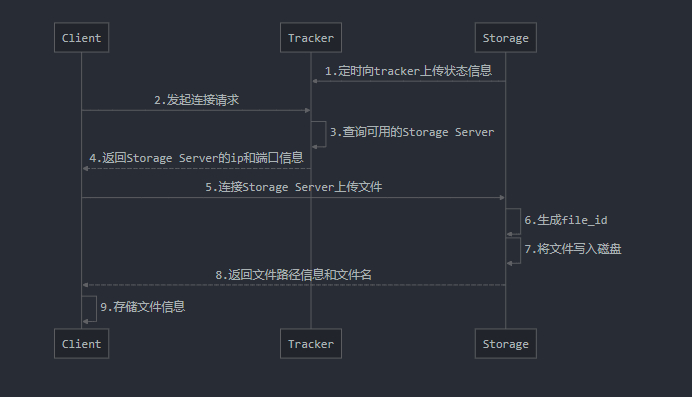
文件上传流程
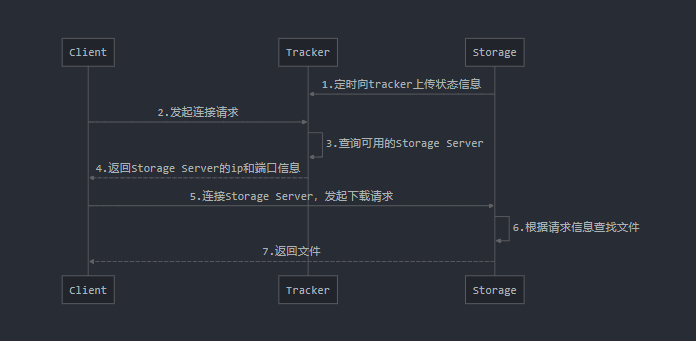
文件下载流程
环境准备
系统
| 名称 | 版本 |
|---|---|
| CentOS | 7.5 |
软件
| 名称 | 版本 | 说明 |
|---|---|---|
| libfastcommon | v1.0.43 | FastDFS分离出的一些公用函数包 |
| fastdfs | v6.06 | FastDFS本体 |
| fastdfs-nginx-module | v1.22 | FastDFS和Nginx的关联模块 |
| nginx | v1.18.0 | web服务 |
安装包可通过点击软件名称进入相关页面下载或者通过命令下载
环境安装
yum install -y wget vim net-tools gcc prel pcre pcre-devel zlib zlib-devel openssl openssl-devel
安装包下载
- fastDFS
wget https://github.com/happyfish100/fastdfs/archive/V6.06.tar.gz - libfastcommon
wget https://github.com/happyfish100/libfastcommon/archive/V1.0.43.tar.gz - fastdfs-nginx-module
wget https://github.com/happyfish100/fastdfs-nginx-module/archive/V1.22.tar.gz - nginx
wget http://nginx.org/download/nginx-1.18.0.tar.gz
服务安装
安装libfastcommon
- 解压
tar -zxvf libfastcommon-1.0.43.tar.gz - 进入解压后的目录
cd libfastcommon-1.0.43/ - 编译并安装
./make.sh && ./make.sh install
安装FastDFS
-
解压
tar -zxvf fastdfs-6.06.tar.gz -
进入解压后的目录
cd fastdfs-6.06 -
编译并安装
./make.sh && ./make.sh install -
查看安装结果
启动脚本
进入
/etc/init.d/目录查看FastDFS提供的启动脚本

fdfs_trackerd是Tracker Server的启动脚本fdfs_storaged是Storage Server的启动脚本
配置文件
进入
/etc/fdfs/目录查看FastDFS配置文件

tarcker.conf.sample是Tracker Server的配置文件模板storage.conf.sample是Storage Server的配置文件模板storage_ids.conf.sample是Storage Server的双IP设置配置文件模板,注:双IP为v6.0支持的特性client.conf.sample是客户端的配置文件模板
配置Tracker Server
进入FastDFS配置文件目录 /etc/fdfs/中修改Tracker Server的配置
-
准备Tracker配置文件
cp tracker.conf.sample tracker.conf -
编辑配置文件
vim tracker.conf -
修改配置
一般情况下修改这两个配置即可,其它配置可根据需求自行配置port=22122 # tracker服务器端口,默认22122 base_path=/usr/local/fastdfs/tracker # 存储日志和数据的根目录 -
创建目录
Tracker启动时配置文件中指定的目录必须存在,否则会启动失败,Storage同理mkdir /usr/local/fastdfs/ mkdir /usr/local/fastdfs/tracker -
启动Tracker服务
方式一:/etc/init.d/fdfs_trackerd start # stop停止,restart重启方式二:
service fdfs_trackerd start # stop停止,restart重启 -
(可选)设置Tracker开机自启
chkconfig fdfs_trackerd on
配置Storage Server
-
准备Storage配置文件
cp storage.conf.sample storage.conf -
编辑配置文件
vim storage.conf -
修改配置
group_name=group1 # 存储卷分组的组名 port=23000 # storage服务端口,默认23000 base_path=/usr/local/fastdfs/storage # 数据和日志文件存储根目录 store_path0=/usr/local/fastdfs/ # 文件存储目录,可设置多个,store_path下标从0开始 tracker_server=192.168.1.110:22122 # tracker服务器IP和端口 http.server_port=8888 # http访问文件的端口,默认8888,与nginx整合时需保持一致 -
创建目录
mkdir /usr/local/fastdfs/storage -
启动Storage服务
方式一:/etc/init.d/fdfs_storaged start # stop停止,restart重启方式二:
service fdfs_storaged start # stop停止,restart重启 -
(可选)设置Storage开机自启
chkconfig fdfs_storaged on
服务测试
首先确认服务是否启动
- 通过
ps -ef | grep fdfs查看进程
- 通过
netstat -tunlp | grep fdfs查看端口监听
确认服务正常运行后,使用FastDFS的命令测试文件上传
-
准备Client配置文件
cp client.conf.sample client.conf -
编辑配置文件
vim client.conf -
修改配置
base_path=/home/moe/dfs tracker_server=192.168.52.2:22122 # 可配置多个tracker服务 -
上传文件
fdfs_upload_file /etc/fdfs/client.conf /home/test.png

返回以上信息表示上传成功,返回的信息含义:
- group1:storage.conf中配置的组名
- M00/00/00:文件存储坐标
- wKgBbl9GJMyAP35dAAEnatHLlNs268:storage服务生成的文件ID
配置http访问
上面将文件上传成功了,但我们无法通过http方式访问以及下载文件,因此安装Nginx作为服务器以支持http方式访问文件
配置fastdfs-nginx-module
fastdfs-nginx-module主要用于解决同一组内文件同步不及时的问题
-
解压
tar -zxvf fastdfs-nginx-module-1.22.tar.gz -
进入解压后的目录
cd fastdfs-nginx-module-1.22/src -
编辑配置文件
vim mod_fastdfs.conf -
修改配置
connect_timeout=10 # 连接超时时间 tracker_server=192.168.1.110:22122 # tracker服务ip和端口 url_have_group_name=true # 访问链接前缀是否加上组名 store_path_count=1 # 文件存储路径数量,有几个store_path就写几个 store_path0=/usr/local/fastdfs # storage存储路径 -
复制配置文件至FastDFS配置文件目录
cp mod_fastdfs.conf /etc/fdfs/ -
修改config文件
由于FastDFS的相关命令安装在/usr/include中,所以需要进修修改vim config执行下面命令,将配置中的
/usr/local/改为/usr/:%s+/usr/local/+/usr/+
安装Nginx
-
解压
tar -zxvf nginx-1.18.0.tar.gz -
进入解压后的目录
cd nginx-1.18.0 -
配置
./configure --prefix=/usr/local/nginx --sbin-path=/usr/bin/nginx --add-module=/usr/local/software/fastDFS/fastdfs-nginx-module-1.22/src- prefix (可选):安装路径,默认
/usr/local/nginx - sbin-path (可选):nginx脚本安装位置,安装在
/usr/bin/nginx路径下可以全局使用,默认/usr/local/nginx/sbin - add-module:niginx模块安装,指定
fastdfs-nginx-module目录下的src目录
- prefix (可选):安装路径,默认
-
编译并安装
make && make install注:如果只是添加模块,不是第一次或者重新安装nginx,则不需要执行
make install命令,make编译后的nginx在当前目录的objs文件夹内,备份旧的nginx脚本,然后将objs文件夹内nginx脚本覆盖旧的nginx脚本即可 -
配置fastdfs-module模块
编辑nginx配置文件vim /usr/local/nginx/conf/nginx.conf添加以下配置
server { # 该端口为storage.conf中http.server_port设置的端口 listen 8888; server_name localhost; # 监听域名中带有group的,交给FastDFS模块处理 location ~/group[0-9]/ { ngx_fastdfs_module; } error_page 500 502 503 504 /50x.html; location = /50x.html { root html; } } -
准备FastDFS http配置文件
进入FastDFS安装包的conf目录cd /usr/local/software/fastDFS/fastdfs-6.06/conf拷贝
http.conf和mime.typescp http.conf mime.types /etc/fdfs/ -
启动nginx
nginx其它命令
nginx -s stop #停止nginx -s reload #重新加载配置注:如果只是给nginx添加模块,并且nginx在运行的情况下,需要重新启动nginx加载模块,务必不要使用
nginx -s reload,该命令只是重新加载配置,并没有重启nginx -
(可选)设置Nginx开机自启
创建一个开机自启脚本vim /etc/init.d/nginx添加以下内容
#!/bin/sh
#
# nginx - this script starts and stops the nginx daemon
#
# chkconfig:   - 85 15
# description:  NGINX is an HTTP(S) server, HTTP(S) reverse \
#               proxy and IMAP/POP3 proxy server
# processname: nginx
# config:      /etc/nginx/nginx.conf
# config:      /etc/sysconfig/nginx
# pidfile:     /var/run/nginx.pid

# Source function library.
. /etc/rc.d/init.d/functions

# Source networking configuration.
. /etc/sysconfig/network

# Check that networking is up.
[ "$NETWORKING" = "no" ] && exit 0

nginx="/usr/bin/nginx"
prog=$(basename $nginx)

NGINX_CONF_FILE="/usr/local/nginx/conf/nginx.conf"

[ -f /etc/sysconfig/nginx ] && . /etc/sysconfig/nginx

lockfile=/var/lock/subsys/nginx

make_dirs() {
   # make required directories
   user=`$nginx -V 2>&1 | grep "configure arguments:.*--user=" | sed 's/[^*]*--user=\([^ ]*\).*/\1/g' -`
   if [ -n "$user" ]; then
      if [ -z "`grep $user /etc/passwd`" ]; then
         useradd -M -s /bin/nologin $user
      fi
      options=`$nginx -V 2>&1 | grep 'configure arguments:'`
      for opt in $options; do
          if [ `echo $opt | grep '.*-temp-path'` ]; then
              value=`echo $opt | cut -d "=" -f 2`
              if [ ! -d "$value" ]; then
                  # echo "creating" $value
                  mkdir -p $value && chown -R $user $value
              fi
          fi
       done
    fi
}

start() {
    [ -x $nginx ] || exit 5
    [ -f $NGINX_CONF_FILE ] || exit 6
    make_dirs
    echo -n $"Starting $prog: "
    daemon $nginx -c $NGINX_CONF_FILE
    retval=$?
    echo
    [ $retval -eq 0 ] && touch $lockfile
    return $retval
}

stop() {
    echo -n $"Stopping $prog: "
    $nginx -s stop
    retval=$?
    echo
    [ $retval -eq 0 ] && rm -f $lockfile
    return $retval
}

restart() {
    configtest || return $?
    stop
    sleep 1
    start
}

reload() {
    configtest || return $?
    echo -n $"Reloading $prog: "
    $nginx -s reload
    RETVAL=$?
    echo
}

force_reload() {
    restart
}

configtest() {
  $nginx -t -c $NGINX_CONF_FILE
}

rh_status() {
    status $prog
}

rh_status_q() {
    rh_status >/dev/null 2>&1
}

case "$1" in
    start)
        rh_status_q && exit 0
        $1
        ;;
    stop)
        rh_status_q || exit 0
        $1
        ;;
    restart|configtest)
        $1
        ;;
    reload)
        rh_status_q || exit 7
        $1
        ;;
    force-reload)
        force_reload
        ;;
    status)
        rh_status
        ;;
    condrestart|try-restart)
        rh_status_q || exit 0
            ;;
    *)
        echo $"Usage: $0 {start|stop|status|restart|condrestart|try-restart|reload|force-reload|configtest}"
        exit 2
esac
修改文件权限
chmod 777 /etc/init.d/nginx添加至服务列表
chkconfig --add /etc/init.d/nginx设置开机自启
chkconfig nginx on
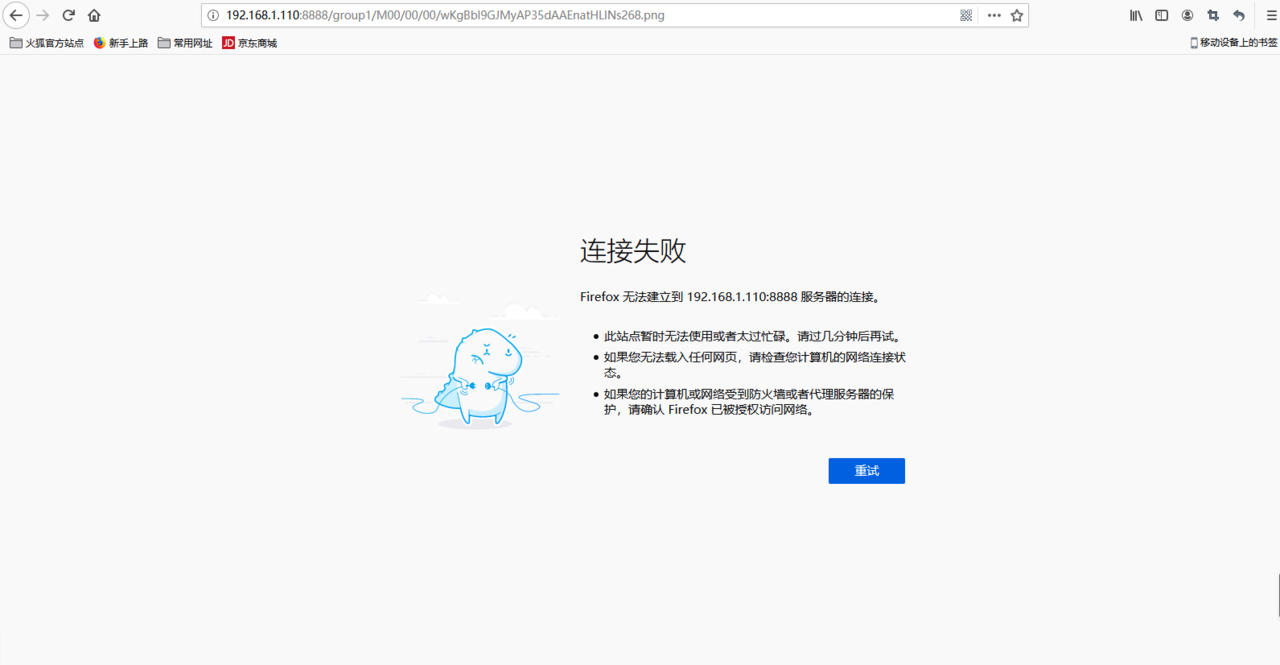
访问测试
-
上传文件
fdfs_upload_file /etc/fdfs/client.conf /home/test.png
-
http访问
此时我们再到浏览器中访问图片,成功显示

标题:Linux 系列之 FastDFS 分布式文件存储服务
作者:hyboll
地址:https://blog.ovoll.cn/articles/2020/08/31/1598841312181.html